
The Stone Circle of Distant Hill
"Trees and stones will teach us that which you can never learn from masters." Saint Bernard of Clairvaux
The Story Behind its Design and Construction
Note: For more photos of the Stone Circle, go to our Flickr Photo Album
My wife Kathy and I have been celebrating the Winter Solstice at friend’s homes since the early 1970’s. In 1980, we bought 21 acres of rocky New England land in the hills of Walpole, New Hampshire. We spent over ten years building our home, gardens, outbuildings, stonewalls, a pond - all the while hoping to find enough time to build a venue for our own Solstice celebration.
Sometime in the early ‘90s our dream came true, and our Winter Solstice tradition began. We built a five-foot diameter fire pit, surrounded by small one-foot tall standing stones, and a 25-foot diameter circle of wooden benches. The circle served its purpose, but we longed for something more permanent. I scoured the nearby woods for any large stones I could find. The best and tallest stones were on our next-door neighbor’s property, but I did find a dozen or so stones on our land that would work. I skidded the stones out of the woods using my small 25 horsepower Kubota tractor with a winch, and a metal stone boat I had built by a local welder.

The stones were not perfect - they were a bit shorter than I would have liked, ranging in height from 3 to 5 feet, but they were what I had to work with.
Unsure of how to lay out the stones, I decided to hold off on the building of the circle and did some research. I bought a few books about stone circles to help me with a possible design. One of those books, ‘A Guide To The Stone Circles of Britain, Ireland and Brittany’ by Aubrey Burl, really inspired me. I learned of the hundreds of stone circles in Europe, many using stones the size of the ones I had at my disposal from our property. My stone circle obsession had begun!
I am part Scotch-Irish, and knew I had some relatives living in Moneymore and Belfast, in Northern Ireland. Why not kill two birds with one stone? Go to Ireland to meet my relatives for the first time, and visit some of the stone circles mentioned in Burl’s guide. Say no more - in the fall of 2002 we were in Ireland. We visited for a day with my Irish family and talked for hours. Then it was off into the countryside looking for stone circles.
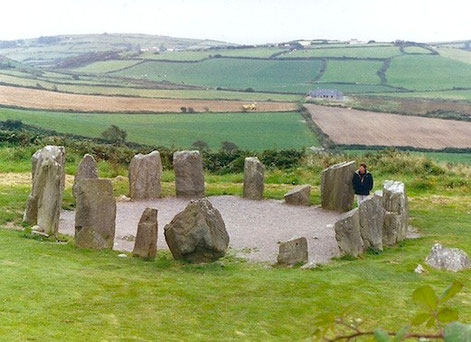
The first circle we saw in Ireland was called Drombeg, also known as the ‘Druid’s Altar,’ three miles west of Ross Carbery, County Cork. It is said to be the best known of the Irish recumbent stone circles, and one of the most interesting because it was fully excavated and restored in 1957.
The stones at Drombeg were somewhat larger than the stone I had waiting back in New Hampshire, but not by much. There are 17 standing stones, in a 31 ft (9.5 m) diameter circle, with the tallest being just over 6 ft (2 m) tall. The recumbent altar stone is about 3 ft wide and high (1 m) and 7 ft long (2.1 m).

It is believed that Drombeg circle was aligned with the winter solstice sunset when it was built. The most recent C-14 radiocarbon dating estimated it was erected in 780+/- 80 bc. We
saw a few other small circles on our trip, but nothing that I connected with like ‘Druid’s Altar.’ I felt confident that I could build a stone circle with the stones I had collected. I could
not wait to get home and get to work.
Upon returning home, we received some good news. About a year earlier, our widowed neighbor - the one who owned the land with the beautiful tall stones I had noticed years ago - had died at home of a heart attack. Shortly after his passing, I let his son know that Kathy and I would be interested in purchasing the 10 acres of forest land that was part of the his father’s property. He declined our offer at the time, but said he would inform the real-estate agent handling the sale to ask any prospective buyers if they would be interested in selling. Sure enough, the house had been sold during our absence, and the new owners would sell us the land. It took a number of months until all the paper work was in order, but in June of 2003 the land - and thus the stones - were officially ours.
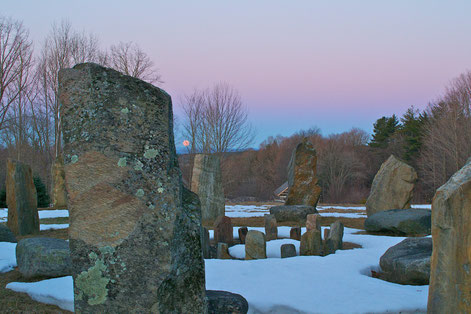
I wasted no time. That summer, I started moving the best stones from the new property out to the field where the circle was to be built. Most of the stones were located as far away from the building site as was possible on our now 31 acres. Due to the terrain, I had a very circuitous quarter mile long route to negotiate with my tractor, stone boat in tow. One by one, the stones were placed in a staging area so I could pick and choose the best stone for each location. In total, I brought out about 25 possible standing stones. I marked out a 30-foot circle, with 16 stakes set to the compass coordinates. A few years before on the winter solstice, I had staked out the location of a sighting stone and an outlying stone, about 60 feet away to the south west, aligning them to the setting sun. This alignment was the element that the entire stone circle would be designed around.

The first stone to be placed was the ‘sighting ring’ stone. Years earlier, in the early 1990’s, I had unearthed a large stone while tilling our pumpkin patch. It was a beautiful 4-foot tall by 3-foot wide by 8-inch thick stone with a missing corner in a shape of a half circle. At the time, I was not sure what I would use it for, but it was definitely unique and worth keeping.
When deciding on how to align the circle to the setting sun, this stone came to mind immediately. I found a 7-inch diameter metal ring from an old wagon wheel hub, and it fit the rounded corner perfectly. The plan was to look through the ring and align the top of a distant stone to the spot on the horizon where the sun set on the Winter Solstice.

The tallest outlying stone was the second stone to be set, and was also an easy choice. Of all the stones I had, there was one that was taller than the rest. About 7-feet 6-inches long, and somewhat pointed - perfect for an alignment stone. For stability, I set this stone about 18-inches deep, leaving about 6-feet showing. This was the deepest of any of the eventual 19 standing stones. A few stones, wide with flat bottoms, are only 6 inches below grade.
With the alignment stones set, I moved to the main compass point locations - north, south, east and west. Using the tallest remaining stones, I set these four standing stones at the same height above ground, 4-foot 6-inches, varying the depth of the excavated pocket accordingly.
At some point, I realized it would be nice to have some sitting stones within the circle, and they would have to be placed before setting all of the standing stones, which would cut off tractor access to the interior. I gathered a dozen candidates in the staging area, and used a total of eight stones. All were about 12-inches above ground and ranged in size from 2 to 3 feet in diameter. Four of them were placed touching the ‘compass point’ standing stones, and the remaining four were set a few feet away from the 5-foot diameter fire pit in the center of the circle.
Moving back to installing the remaining standing stones, I set four more stones at the NE, SE, NW and SW compass points. As with the main compass point stones, these were also set at the same height relative to each other - in this case about 42 to 48 inches above ground. Then I finished the circle with eight more slightly smaller stones placed midway between the eight compass point stones already standing. I had one more very pointed 6-ft tall stone that I felt would help make the alignment more precise, so I set that ten feet outside the circle with its point lined up with the outlying stone’s tip when viewed through the ‘sighting ring.’ This made a total of 16 standing stones in the circle, 1 sighting ring stone, 2 outlying alignment stones and 8 sitting stones.
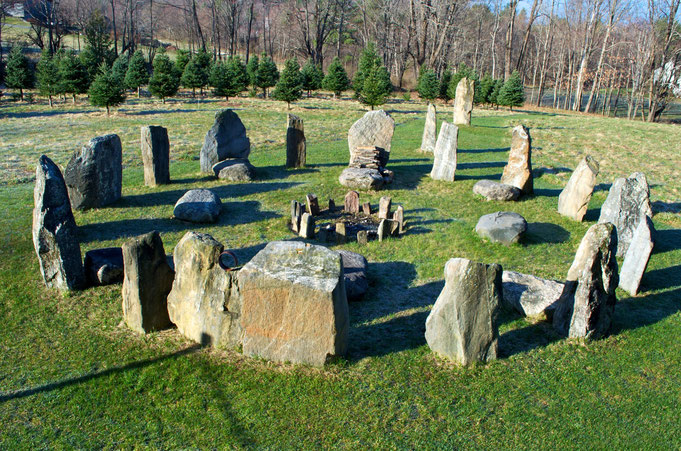
From start of construction to clean up, the project took me about two weeks, working alone the entire time. It is amazing what a small tractor, a winch, a stone boat, some heavy duty straps, a good pry bar, some pieces of 4 inch metal pipe for rollers, the use of basic physics, and lots of patience can accomplish.
Michael Nerrie
April 3, 2012

Distant Hill was listed as one of the Top 10 Places to Visit in New Hampshire!
Friends of Distant Hill (dba Distant Hill Gardens and Nature Trail) is a nonprofit,
tax-exempt organization under Section 501(c)(3) of the U.S. Internal Revenue Code.
Donations are tax-deductible as allowed by law. Tax ID# 84-3765898
or send a check via Snail Mail to:
Distant Hill Gardens and Nature Trail, 507 March Hill Road, Walpole, NH 03608